Now that your website is live, it's time to make it yours! In this section, you'll learn to understand the files in your repository, edit your website's content, and customize it with your own text, images, and documents.
Understanding Your Website Files
Before we start editing, let's understand what each type of file does. This will make editing much easier and less intimidating!
1. HTML Files (.html)
What they do: HTML files contain the content and structure of your web pages—all the text, headings, paragraphs, links, buttons, and sections you see on the website.
Think of HTML as: The skeleton and organs of your website. It determines what appears on the page and how it's organized.
Key HTML file:
index.html— This is your homepage, the main page people see when they visit your site
Additional HTML files (if you have a multi-page site):
about.html— Your about/bio pageprojects.htmlorportfolio.html— Your work showcasecontact.html— Your contact page- And possibly others depending on your template
- One-page website: Everything (About, Portfolio, Contact) is on the same page (index.html). You just scroll down to see different sections.
- Multi-page website: Each section has its own page. You click navigation links to go to different pages.
2. CSS Files (.css)
What they do: CSS files control the visual design and styling of your website—colors, fonts, sizes, spacing, layouts, and all the visual appearance.
Think of CSS as: The clothing, makeup, and decoration of your website. It makes everything look beautiful and professional.
Common CSS files:
style.css,styles.css, ormain.css— Your main stylesheet- Sometimes you'll see multiple CSS files for different parts of the site
3. JavaScript Files (.js) [Optional]
What they do: JavaScript adds interactive features and functionality—animations, form validation, interactive menus, and dynamic content.
Think of JavaScript as: The appliances and smart features in your house. Not essential for basic functionality, but adds convenience and interactivity.
Do you need to edit JavaScript? Usually not! Most templates work fine without touching JavaScript files. We'll only mention if you need to edit them.
4. Image Folder (/images or /img)
What it contains: All the photos, graphics, icons, and visual assets used on your website.
Common image files:
profile-photo.jpg— Your headshot or profile pictureproject1.png,project2.png— Screenshots of your workbackground.jpg— Header or background imageslogo.png— Site logo or personal brand
5. Files/Documents Folder (/files or /documents)
What it contains: Downloadable documents like your resume, CV, project reports, or other PDFs you want to share.
Common files:
resume.pdf— Your resume/CVportfolio.pdf— Portfolio samplestranscript.pdf— Academic transcripts
6. README.md File
What it is: A markdown text file that provides information about the template—instructions, features, credits.
Should you edit it? No, this file is just for your reference. Read it to understand the template better, but you don't need to change it.
Step 8: Open Your index.html File
Now let's start editing! We'll begin with your homepage.
What to do:
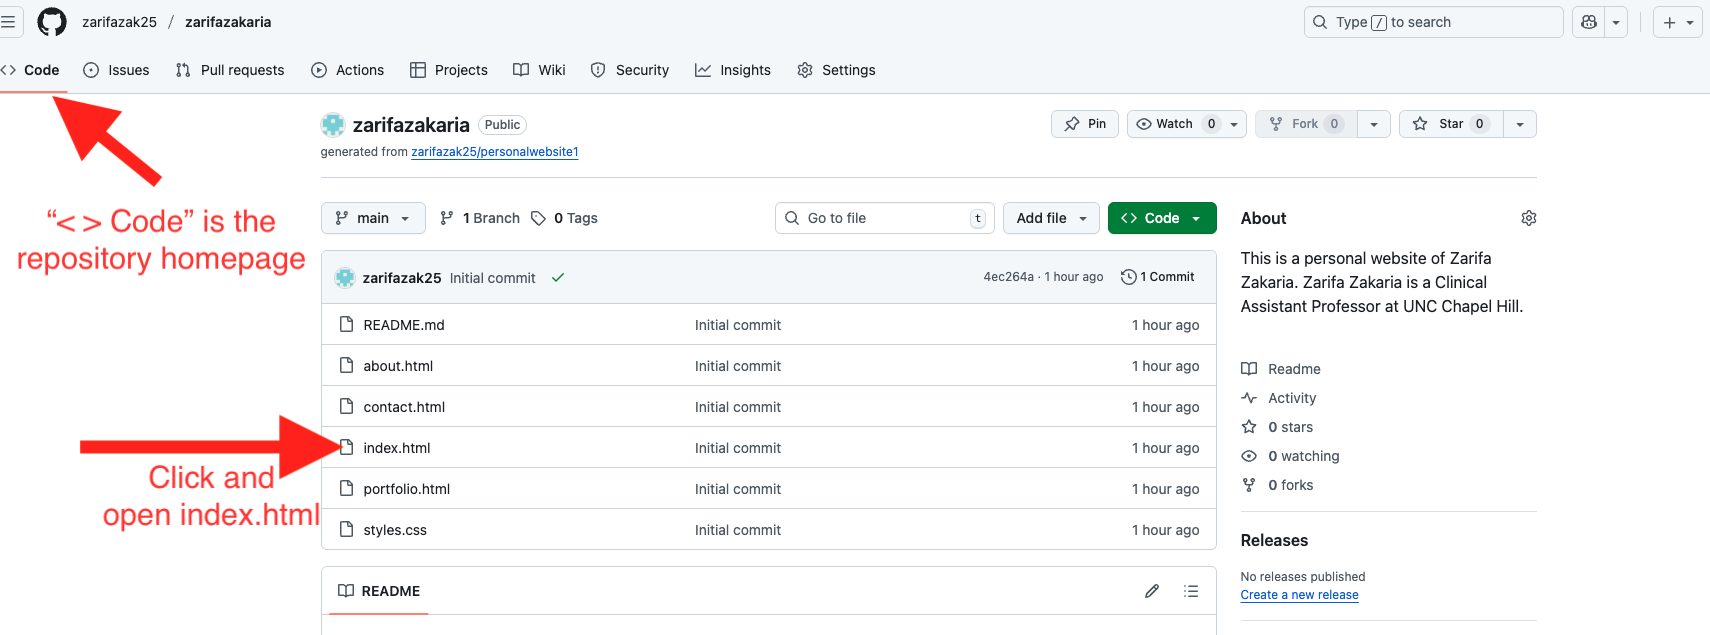
- Go to your repository homepage (click the
<> Codetab if you're not already there) - In the file list, find and click on
index.html - The file will open in "view mode" where you can see the code but not edit it yet
Step 9: Enter Edit Mode
To make changes, you need to switch from "viewing" the file to "editing" it.
What to do:
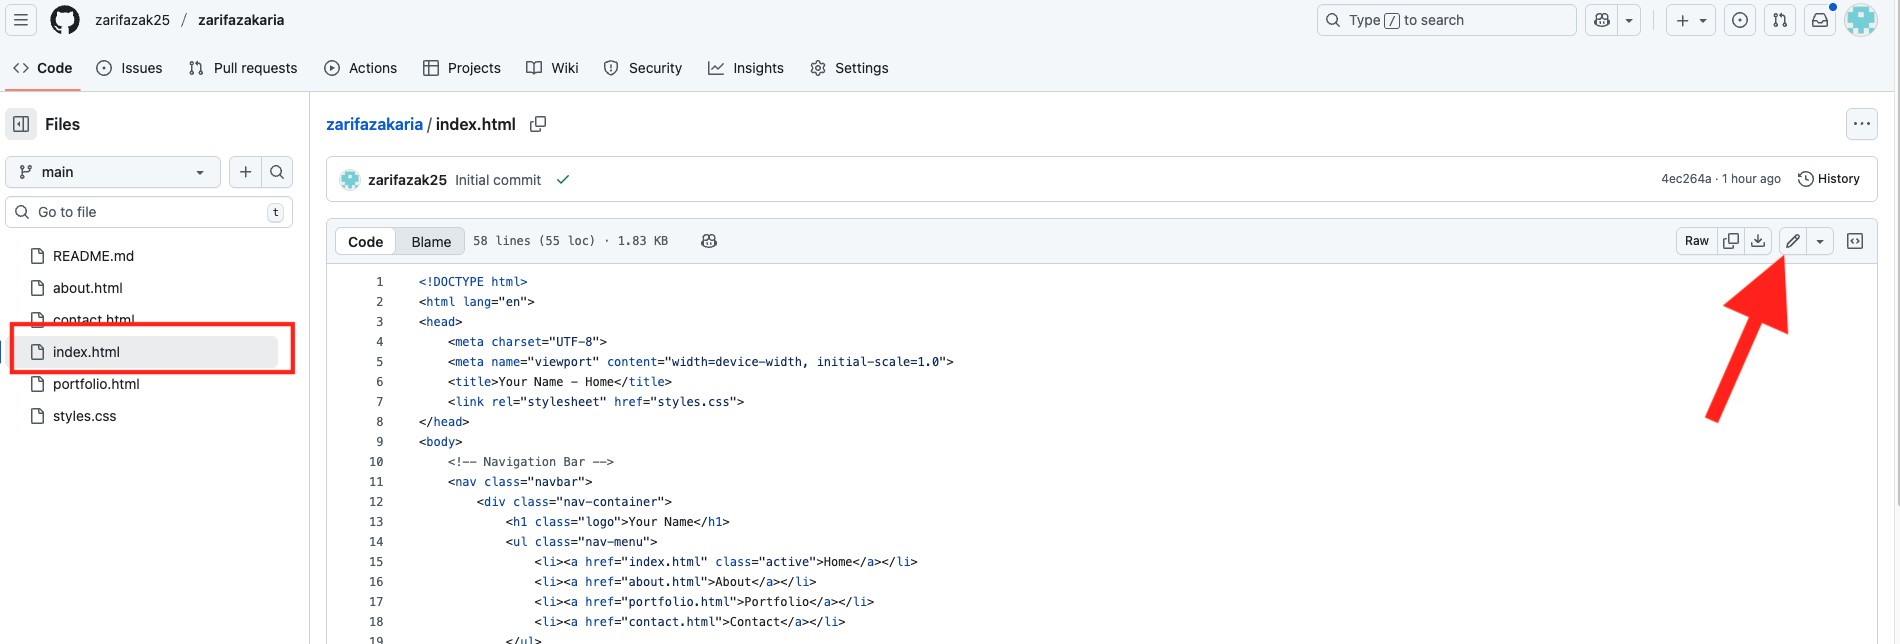
- Look for a pencil icon (✏️) in the top right area of the file viewer
- The pencil might be next to text that says "Edit" or "Edit this file"
- Click the pencil icon
- The file will now switch to edit mode—you can type and make changes!
Step 10: Reading and Understanding the HTML File
Before you start editing, take a few minutes to read through the file. Don't try to understand every single line—we'll focus on what matters.
What to Look For (and What to Ignore):
🚫 IGNORE these technical codes:
<div>,</div>— Containers for sections<nav>,<section>,<header>— Structural elementsclass="..."— CSS styling references- Any code inside
< >angle brackets (these are HTML tags)
These are the "behind-the-scenes" structural codes. You don't need to understand them to edit your content!
✅ FOCUS ON these readable texts:
- Regular text that looks like sentences and paragraphs
- Your name, titles, headings
- Descriptions and paragraphs about you
- Menu/navigation items
- Button text
This is the content that actually appears on your website—this is what you'll change!
Understanding Comments:
You'll see text wrapped in special symbols:
<!-- This is a comment explaining what the next section does -->Comments are notes left by the template creator to help you understand the code. They:
- Don't show up on your actual website
- Are just for your reference
- Explain what each section of code does
Understanding Color Coding:
GitHub's code editor uses colors to help you read the code:
- Blue text: HTML tags (the structural code)
- Green text: Comments (explanatory notes)
- Black/dark text: Your actual content (the text you'll edit!)
- Red/purple text: Attributes and values
Example of What You'll See:
<!-- Hero Section: This is the main banner at the top -->
<section class="hero">
    <h1>Welcome to My Website</h1>
    <p>Hi! I'm [Your Name], and this is my personal space on the web.</p>
    <a href="about.html" class="btn">Learn More About Me</a>
</section>
What to edit in this example:
- "Welcome to My Website" → Change to your preferred headline
- "[Your Name]" → Replace with your actual name
- "this is my personal space on the web" → Write your own intro
- "Learn More About Me" → Keep or change the button text
What NOT to change:
<section class="hero">— Leave this alone<h1>,</h1>— These are tags, don't delete them<a href="about.html" class="btn">— This creates the button, keep it
> and <), never delete the tags themselves unless you want to remove an entire section!
Step 11: Editing Your Website Text
Now for the fun part—making the website about YOU!
What to do:
- Start from the top of the index.html file
- Read through slowly, looking for text that should be personalized
- Replace placeholder text with your own information
- Go section by section through the entire file
Common Sections to Edit:
1. Page Title (in the <head> section):
<title>John Doe - Web Developer</title><title>Jane Smith - UX Designer</title>This is what shows in the browser tab when someone visits your site.
2. Main Heading/Hero Section:
<h1>Hi, I'm [Your Name]</h1>
<p>I'm a passionate web developer creating amazing experiences.</p><h1>Hi, I'm Sarah Johnson</h1>
<p>I'm a graphic designer who loves creating visual stories that inspire.</p>3. About Section:
<h2>About Me</h2>
<p>Lorem ipsum dolor sit amet, consectetur adipiscing elit. I have 5 years of experience in web development...</p><h2>About Me</h2>
<p>I'm a recent graduate from UCLA with a degree in Computer Science. I specialize in front-end development and love building user-friendly websites. When I'm not coding, you'll find me hiking in the mountains or trying new coffee shops.</p>4. Navigation Menu:
<nav>
    <a href="#home">Home</a>
    <a href="#about">About</a>
    <a href="#projects">Projects</a>
    <a href="#contact">Contact</a>
</nav>
You can usually keep these as-is, or customize the text slightly (e.g., "Projects" → "My Work").
Tips for Editing Text:
- If the template has 3 paragraphs in the About section but you only need 2, delete the third paragraph
- If you want to add more content, copy and paste a paragraph structure and add your own text
- The website will automatically adjust to your content
- Spell-check and proofread first
- Take your time crafting good descriptions
- Simply copy-paste into the HTML when ready
Safe Deletion Guidelines:
Want to remove a section entirely? Here's how:
- Find the opening tag (e.g.,
<section class="projects">) - Find the matching closing tag (e.g.,
</section>) - Delete everything from the opening tag to the closing tag
- Make sure you delete both tags!
Step 12: Saving Your Changes (Commit)
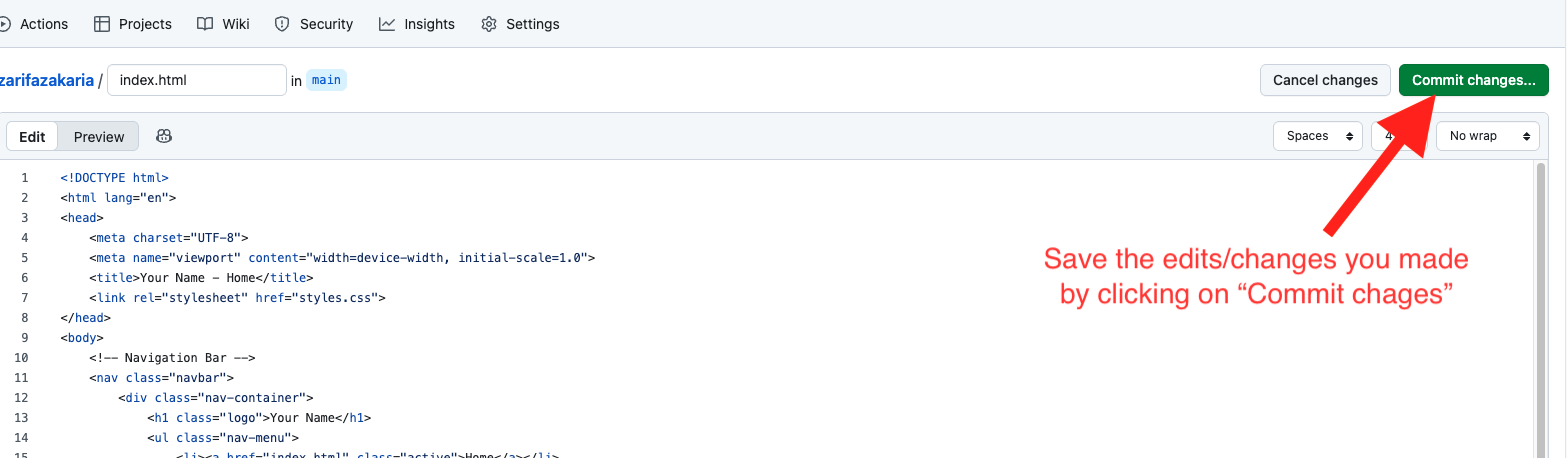
This is THE MOST IMPORTANT step! In GitHub, you don't just click "Save." You have to "commit" your changes.
What is a "Commit"?
A commit is GitHub's way of saving changes. It creates a snapshot of your files at this moment in time. Think of it like clicking "Save Version" in a document—GitHub keeps track of every version you save.
How to Commit Your Changes:
- After editing your text, scroll down to the bottom of the page
- You'll see a section called "Commit changes"
- There are two text fields:
- First field (required): A short description of what you changed
- Example: "Updated homepage with my name and bio"
- Example: "Changed About section text"
- Second field (optional): A longer detailed description (you can leave this blank)
- First field (required): A short description of what you changed
- Make sure "Commit directly to the main branch" is selected
- Click the green "Commit changes" button
Step 13: Viewing Your Changes on the Live Site
After committing changes, you'll want to see them on your actual website!
Important timing information:
Changes don't appear instantly. GitHub Pages needs time to rebuild your website.
- Typical wait time: 1-3 minutes
- Sometimes longer: 5-10 minutes during high traffic
How to view your changes:
- Wait 2-3 minutes after committing
- Go to your repository homepage (click
<> Codetab) - Click your website link in the "About" section (remember Step 7?)
- Hard refresh your browser:
- Windows/Linux: Press
Ctrl + Shift + R - Mac: Press
Cmd + Shift + R - Or clear your browser cache
- Windows/Linux: Press
Still not seeing changes?
- Wait a full 5 minutes (seriously, sometimes it just takes time)
- Try opening the site in an incognito/private browsing window
- Try a different browser
- Check if your changes were actually committed (go to your repo → Code tab → click on index.html to view it)
🎊 Excellent Progress!
You've learned the fundamentals of editing your website:
- ✅ Understanding HTML file structure
- ✅ Reading and interpreting code
- ✅ Editing text content safely
- ✅ Committing changes properly
- ✅ Viewing your changes live
- Add and replace images
- Upload documents like your resume
- Edit CSS to change colors and styles
- Customize navigation and links
Continue to the next parts to complete your website customization!